Mobile BI Application for Fusion:
STEP 1: Configure 'APPS' Library
=====================================================================
Mandatory and first step to create any Mobile BI Application is to configure “Apps Library” under below path with exact name “Apps Library”.
Apps Library is the folder which used to publish all applications.
Path: Shared Folder > Custom > “Apps Library”
Once, this folder is created under the mentioned path, SR needs to be raised to configure this folder from Oracle side.
SR Details: “Configure Apps Library to Publish BI Mobile Application”.
STEP 2: Create Mobile Application
=====================================================================
Once Oracle confirms that “Apps Library” Folder has been configured, then we can create any Mobile Application.
Step 2.1: Go to Below Navigation
Navigation to start: New > Mobile Application
Step 2.2: Select Mobile or Pad for which application needs to be created
Step 2.3: Select the subject area for which report should be created.
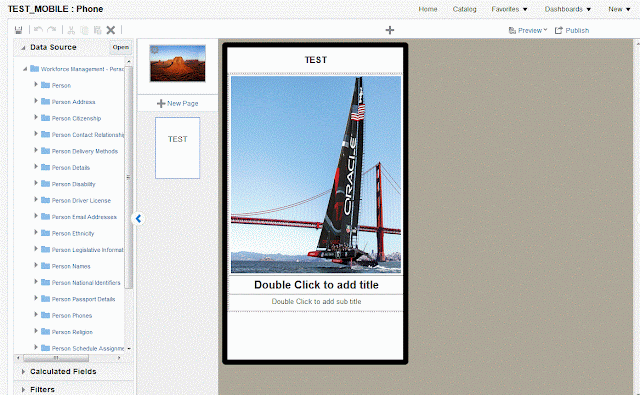
Step 2.4: Design Application as per the requirement.
- Different pages, Tables & Chart Diagrams can be added as per the requirement.
Step 2.5: Publish Application
- Click on “Publish” as shown in below screenshot.
- Select “Local”
- If App is new then select 1st option as shown in below screenshot else select modification option which is 2nd option.
- Publish the application.
Step 2.6: Preview and Share Application
- System will show the preview of the application. Application can be shared by clicking on “Share” button.
- Share button will show QR barcode and link. By using any of these, application can be open in Mobile.
STEP 3: Mobile/TAB Setup for application
=====================================================================
STEP 1: Configure 'APPS' Library
=====================================================================
Mandatory and first step to create any Mobile BI Application is to configure “Apps Library” under below path with exact name “Apps Library”.
Apps Library is the folder which used to publish all applications.
Path: Shared Folder > Custom > “Apps Library”
Once, this folder is created under the mentioned path, SR needs to be raised to configure this folder from Oracle side.
SR Details: “Configure Apps Library to Publish BI Mobile Application”.
STEP 2: Create Mobile Application
=====================================================================
Once Oracle confirms that “Apps Library” Folder has been configured, then we can create any Mobile Application.
Step 2.1: Go to Below Navigation
Navigation to start: New > Mobile Application
Step 2.2: Select Mobile or Pad for which application needs to be created
Step 2.3: Select the subject area for which report should be created.
Step 2.4: Design Application as per the requirement.
- Different pages, Tables & Chart Diagrams can be added as per the requirement.
Step 2.5: Publish Application
- Click on “Publish” as shown in below screenshot.
- Select “Local”
- If App is new then select 1st option as shown in below screenshot else select modification option which is 2nd option.
- Publish the application.
Step 2.6: Preview and Share Application
-
Click on Preview
- System will show the preview of the application. Application can be shared by clicking on “Share” button.
- Share button will show QR barcode and link. By using any of these, application can be open in Mobile.
STEP 3: Mobile/TAB Setup for application
=====================================================================
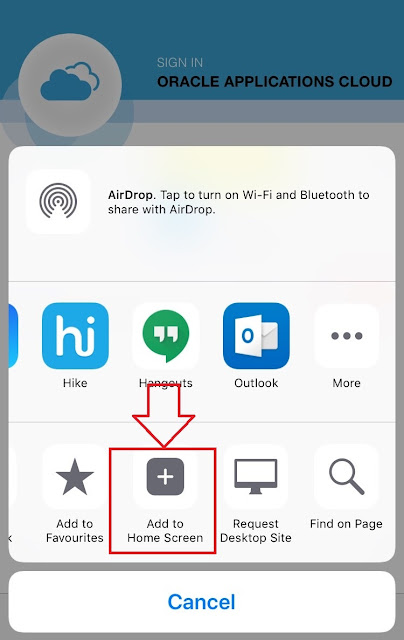
Iphone setup steps:
-
Open ‘Safari’ and click on the
button as showed in below screenshot.
-
Add it to home screen button.
-
Icon on Screen


Wonderful Blog thanks for sharing this informative article.
ReplyDeleteOracle Fusion HCM Online Training
Oracle Fusion SCM Online Training
Oracle Fusion Financials Online Training
Big Data and Hadoop Training In Hyderabad
Good Blog thanks for sharing this informative article.
ReplyDeleteOracle Fusion HCM Online Training
Oracle Fusion SCM Online Training
Oracle Fusion Financials Online Training
This comment has been removed by the author.
ReplyDelete