Wednesday, 8 July 2020

Oracle HCM Cloud Performance Management : Upload Historical Performance Rating


Recent Release Oracle has provided area to maintain historical performance rating for the employee. 

This area is under 'Talent Rating' part of the Talent Profile of an employee. Currently, the system only allows uploading this information only by HDL. User can not enter this information manually from the front end.


Follow the below steps to upload performance ratings 

1. Enable Performance Rating 

Navigation : 
My Client Group > Profile > Profile Types > Person > Performance Rating

Select the relevant Rating Model and check the Active button.


2. Upload Performance Rating using below demo HDL 

METADATA|TalentProfile|SourceSystemOwner|SourceSystemId|ProfileTypeCode|ProfileCode|ProfileStatusCode|ProfileUsageCode|PersonNumber|ProfileId

MERGE|TalentProfile|||PERSON||A|P|43|300000064912773


METADATA|ProfileItem|SourceSystemId|SourceSystemOwner|DateFrom|ProfileCode|ContentItemId|ProfileId|SectionId|ContentTypeId|RatingModelId1|RatingModelCode1|RatingLevelId1|RatingLevelCode1|QualifierId1|QualifierCode1|QualifierSetCode1|DateTo

MERGE|ProfileItem|Profile_Item_43_1|HDL|2018/01/01|||300000064912773|12501|125|300000064483593||300000064483615||83|||2018/12/31 


The query which can be helpful 

You can load Profile Items in the "Performance Rating" section of someone's Profile using the discriminator ProfileItem available in the HDL business object TalentProfile.dat

You have to specify the

PROFILE_ID
SECTION_ID
CONTENT_TYPE_ID
RATING_MODEL_ID1
RATING_LEVEL_ID1
QUALIFIER_ID1
DATE_FROM
DATE_TO


If the DATE_TO is null or if it is in the future then the item will be displayed in the UI without clicking on Show Previous Ratings

If the DATE_TO is in the past, then the item will be displayed in the UI only when you click on Show Previous Ratings

You can run this query to identify the fields

SELECT c.PROFILE_TYPE_ID ,
d.NAME SECTION_NAME ,
c.SECTION_CONTEXT ,
c.SECTION_ID ,
c.CONTENT_TYPE_ID ,
a.FIELD_NAME ,
b.ATTRIBUTE_LABEL LABEL_FROM_THE_UI ,
'-->' IS_USING ,
a.COLUMN_NAME ATTRIBUTE_USED_IN_HDL ,
a.VALUE_SET_NAME ,
a.INPUT_FIELD_TYPE_CODE ,
a.DISPLAY_FLAG
FROM HRT_PROFILE_TYP_SECTIONS c ,
HRT_PROFILE_TYP_SECTIONS_TL d,
HRT_PROFILE_TP_SC_PRP_B a ,
HRT_PROFILE_TP_SC_PRP_TL b
WHERE a.SECTION_PROP_ID =b.SECTION_PROP_ID
AND a.SECTION_ID =c.SECTION_ID
AND d.SECTION_ID =c.SECTION_ID
AND b.LANGUAGE ='US'
AND d.LANGUAGE ='US'
AND a.SOURCE_CODE IS NULL
AND a.DISPLAY_FLAG !='N'
AND c.TEMPLATE_BASED_SECTION_FLAG='Y'
AND (SECTION_CONTEXT LIKE '%PERSON_PERFORMANCE%' or SECTION_CONTEXT LIKE '%PERSON_POTENTIAL%')
--AND d.NAME LIKE '%replace_with_section_name%'
--AND b.ATTRIBUTE_LABEL LIKE '%replace_with_the_label_of_a_standard_field_as_you_see_it_in_ManageProfileTypes%'
ORDER BY c.PROFILE_TYPE_ID,
c.SECTION_ID ,
a.DISPLAY_ORDER

Note: 
Loading an item in a Talent Rating section is like loading any other Profile Item in any other section such as loading a Competency in the Competencies section or loading a Language in the Languages section


Tables which can be helpful 

HRT_RATING_MODELS_VL   
HRT_RATING_LEVELS_VL   
HRT_QUALIFIERS_VL   
HRT_PROFILES_VL   
PER_ALL_PEOPLE_F


Wednesday, 25 April 2018

Oracle Cloud Fusion : Create integrated Mobile BI Application to show reports

Mobile BI Application for Fusion:


STEP 1:  Configure 'APPS' Library
=====================================================================

Mandatory and first step to create any Mobile BI Application is to configure “Apps Library” under below path with exact name “Apps Library”.

Apps Library is the folder which used to publish all applications.


Path: Shared Folder > Custom >  “Apps Library”


Once, this folder is created under the mentioned path, SR needs to be raised to configure this folder from Oracle side.


SR Details: “Configure Apps Library to Publish BI Mobile Application”.


 STEP 2:  Create Mobile Application

=====================================================================

Once Oracle confirms that “Apps Library” Folder has been configured, then we can create any Mobile Application.


Step 2.1: Go to Below Navigation

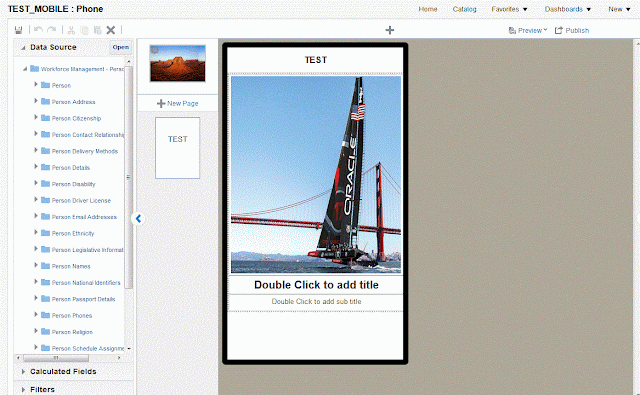
Navigation to start: New > Mobile Application


Step 2.2: Select Mobile or Pad for which application needs to be created


Step 2.3: Select the subject area for which report should be created.


Step 2.4: Design Application as per the requirement.


-      Different pages, Tables & Chart Diagrams can be added as per the requirement.


Step 2.5: Publish Application

-      Click on “Publish” as shown in below screenshot.


-      Select “Local”


-      If App is new then select 1st option as shown in below screenshot else select modification option which is 2nd option.


-      Publish the application.


Step 2.6: Preview and Share Application


-      Click on Preview


-      System will show the preview of the application. Application can be shared by clicking on “Share” button.


-      Share button will show QR barcode and link. By using any of these, application can be open in Mobile.


 STEP 3:  Mobile/TAB Setup for application
=====================================================================


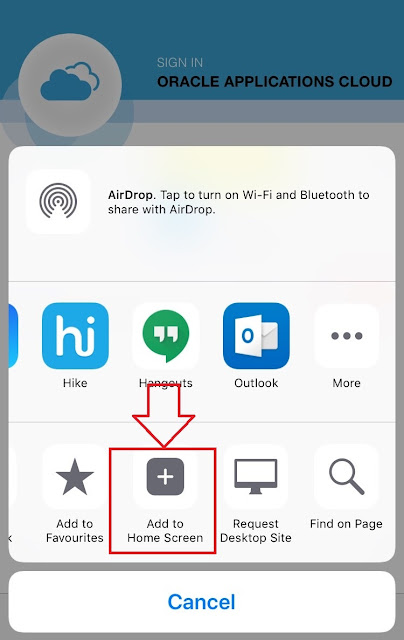
Iphone setup steps:

-      Open ‘Safari’ and click on the button as showed in below screenshot.


-      Add it to home screen button.


-      Icon on Screen


Tuesday, 7 November 2017

Configure Oracle Mobile Application ( Oracle TAP )


Step 1:

1. Open your BROWSER on your device. Type the address: 

                https:// XXXX.hcm.YY.oraclecloud.com/hcmCore/rest/setup 
                          
                 XXXX  :  Your POD name ( i.e., abcd-test , abcd-dev1 )
                  YY       :  em3, em2, us ( as per URL YY will be changed)
i.e., 
            Instance URL:
                         https:// ABCD.hcm.us.oraclecloud.com/  OR
                         https:// ABCD.fs.us.oraclecloud.com/
 
Mobile URL  will be : 
                        https:// ABCD.hcm.us.oraclecloud.com/hcmCore/rest/setup

A screen will open up. Provide your credentials and click on Log IN


Step 2:

2. Click on Agree link after reading the terms


It will open a page with 2 options: 1 Install TAP and 2 Click here to configure your account
if you have not installed the application yet then install the app from 1. Click on Install


When clicked on Install app link in 1 you will be directed to your app store.


Step 3:

3. Install the app


Step 4:

4 .Open the app which you installed just now. The app will ask you for log in ID and password which is same as your fusion ID and password


After keying in user name and password you will be able to log in successfully into Fusion


These steps you should make first time when you configure the device.

To avoid issues, please log out TAP and close the application every time you use.